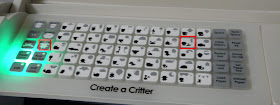
Over the few years I've been a scrapbooker, I never really thought I had a "specialty", but it seems like I'm the "go to" person in my small group of friends when it comes to Cricut layers. I will start this off by saying I have the little original Cricut. I think the bigger/newer ones are cool, but I can't justify the expense (nor afford it right now) when this one works just fine. That being said, the principle is still the same regardless of if you're using the baby Cricut like mine or the Expression.
The cartridge I'll be using for this example is one of my favorites. It's called "Create a Critter". I really want the second one, Create a Critter 2, but again, not in the budget right now. I flip through the pages in the cartridge book until I find the character I want to make, in this case it's the pirate octopus.
I put the keyboard overlay on the Cricut, put the cartridge in and turned on the machine. It helps if you get the paper you are going to use out and ready. I decided that the octopus was going to be blue, the hat and a telescope black and the shadow brown (to match the paper I plan on using for my nephew's card). First, let's cut the hat and telescope. Just by looking at the book, you can see that the only layer that has the body of the hat is the one on the left. It also includes the telescope and the body of the octopus.This means that I need to use black paper. That would give me a black octopus too, but I'll address that in another step. You can see under the image that we're wanting to cut that it says . That means that we ONLY need to press the octopus key. First select the size you want. I used 2 inches. Load your paper and then press the octopus key and then the CUT.
I took the pieces and sat them aside. Now, I'm going to cut another octopus in the color I want, which is blue. Looking at the book again, we can see on the top line right under a seahorse, is a layer that has just a telescope and an octopus. Perfect. Personally, I stick a few different colored paper squares on the same cutting mat, but you can also do one color at a time. Switch to the color you want to use for the Octopus body. Leave your cutting size the same.
If we check the book again, we'll see that the one we want to cut is layer one. (Note that if we wanted to cut that seahorse, since it's "on top", we'd hit layer one and then shift key). Hit layer one, and then the octopus key and then cut. You'll end up with the octopus and a telescope piece. Set those aside.
Next, we'll cut the little skull and white piping for the pirate hat. Looking at the book, we'll see that's layer 2. I set my Cricut up to cut on a small piece of white. I leave the size the same. I hit the layer 2 button, the octopus and then Cut. The piping is a little tricky to get off the mat, so be GENTLE and then set the finished pieces aside.
If we look back at the book, we'll see that layer 3 is just two little circles? That's the cheeks for our octopus. Set your cricut to cut your desired cheek color. Mine was pink. Select the layer 3 button and then the Octopus button. Leave the size selection the same.
The next step is to cut the shadow. It's optional, but I feel like the shadow really makes the critter look "finished". I chose to use the shadow color of dark brown to match the paper I'm going to use on my nephew's card. Set your cricut up to cut the shadow color, leave the size the same and then push the Shadow and then the octopus buttons and press cut
So now we're left with a pile of little pieces. Personally, when I'm putting together little pieces like this, I like to use a glue stick that's made for Scrapbooking. The pieces are so little that a tape runner is not going to work. If you have one of those little glue pens, that should work too. Here's all the pieces I was left with:
I cut a piece out of the head of the black octopus that's just big enough to fit behind the eyes and mouth of the blue octopus and then carefully glued all the pieces together. I layered the blue telescope UNDER the black one because the black one has a little hole cutout at the end for the
lens of the telescope. I was left with this little guy.
lens of the telescope. I was left with this little guy.
Sometimes, the Cricut layering can be tedious to put together but the results are usually well worth the time. I mean, imagine this little guy on a birthday card? Once I finish the card, I'll be sure to upload it here. Did this little tutorial help you? What's your favorite Cricut cartridges?


No comments:
Post a Comment